

Week 1 / Class 2
- Jan 11, 2022
- 2 min read
Updated: Mar 25, 2022
For this class, I started with gathering more modeling references for my neon sign. Joe recommended I find pictures of a marquee here in Savannah so I included those as well as some others I found in my research. While my camera is not going to get close enough to see the nuts and bolts of the sign, I still needed a good idea of how the signs are built. Modeling the letters of the sign in Maya will be easy with the 3D Type tool so the difficult part will be the tubes of the neon lights.


In an attempt to find a more efficient way to model tubes that doesn't involve extruding along all the curve of the letters, I came across a new feature in Maya 2022 which is the Sweep Mesh Tool...
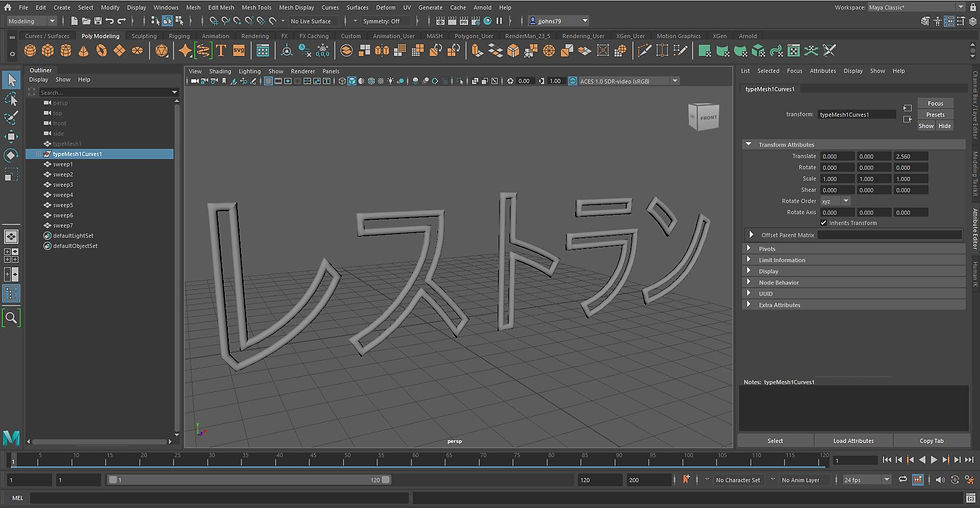
I made a test file and used the 3D Type Tool to write my letters (restaurant in Japanese, in this case)

I then created curves from type using the button under 'Mesh Settings'

With the curve selected, I used the 'Sweep Mesh' tool under the Poly Modeling toolbar (but it can also be found under 'Create' - 'Sweep Mesh')

I then adjusted the scale profile, the interpolation, and the normals under the 'sweepMeshCreator' to resize and smooth out the mesh. I applied those same settings to the rest of my curves and here is my final result!
While this was just a test run to figure out how well the new Sweep Mesh tool will work for me, it is clear this is a much more efficient way to model the tubes of my neon lights. I did not get as far as I wanted since I was trouble-shooting but that's okay this is for my focal point.
My progress for this update is that I modeled my focal point sign. I am going back and forth about adding horizontal tubes like the second reference picture from my first post.


Comments